Programmatically Creating a Block in Drupal 9 – A Brief Tutorial Suresh Prabhu 07 Dec, 2021
Blocks are an integral part of any Drupal website. They are chunks of content that can be placed in various regions and can be easily moved around the web page. Blocks can contain simple text, forms, or some complex logic. The Block module is a core module since Drupal 8 and simply needs to be enabled to get it to work. Sometimes, installing other core or contributed modules can automatically enable them too.
Although these blocks can be modified to suit the layout, complete flexibility and customization can only be achieved with custom blocks. You can create a custom block programmatically or via the Drupal Interface. Here, we will be creating a block programmatically and enabling it through the admin interface.
Drupal 8 has now reached EOL. Now is the time to migrate to Drupal 9. However, if you’re still trying your hands out at creating a custom module in Drupal 8, these steps will work for a Drupal 8 setup too.

How to Create a Custom Block in Drupal 9?
Let us get started with creating a custom block in Drupal 9 in a few simple steps:
1. Create a module
To create a custom block, it is necessary to create a “.info.yml” file in modules/custom directory. Here a custom directory does not exist. You will need to create it. Create a directory named “custom” under the module directory. And under “modules/custom” create a directory called “block_example”. This directory name will be the name of the module created.
Inside this folder that you just created, create a “.info.yml” file. Here it will be block_example.info.yml as the module name is block_example. Within this file, enter the following contents:
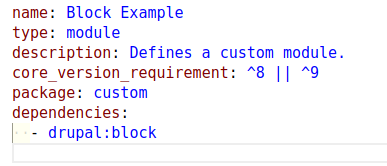
After creating the folder and file with the above content, go to the dashboard and enable the module you just created. The name of the module here is Block Example.

2. Create a Drupal Block Class
Now to define the logic for the block, we must define the Drupal block class. We need to follow PSR-4 standard code for custom blocks. The php class of the block is placed under modules/custom/block_example/src/Plugin/Block directory. Create this folder structure and create a class named ExampleBlock.php under the Block directory.
This file should contain:
- Annotation metadata – This will help to identify the Block created. To know more about Annotation check Annotations-based plugins.
- Annotation contains:
The “id” which is a unique, machine readable ID for the custom block created.
The “admin_label” defines the human readable name of the custom block which is displayed in the admin interface.
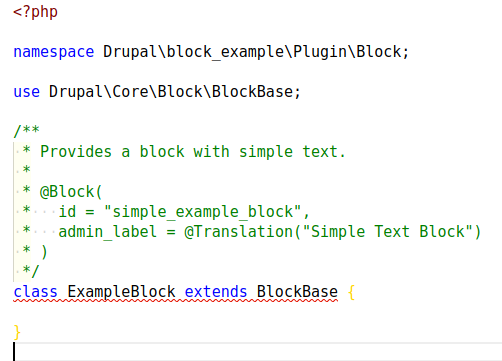
The ExampleBlock extends Blockbase class which will provide generic block configuration form, block settings, and handling of user defined block visibility settings.
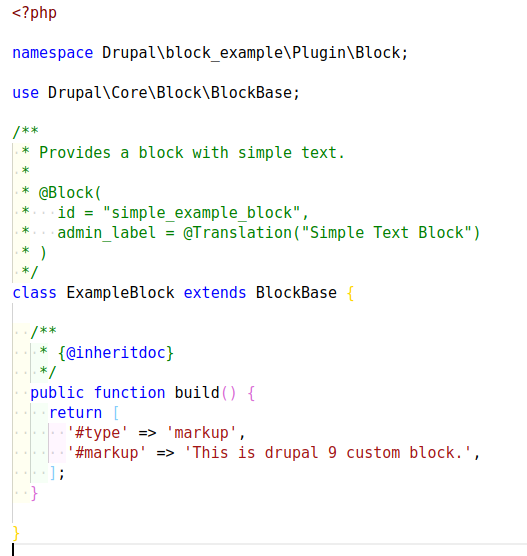
Here we are displaying a markup in the block.
3. Enable the Block to display the content
- After saving the file to enable the block, go to admin > Structure > Block layout.
- Click on Place block under the region the block should be displayed. Here the block is placed in ‘Sidebar second’.
- After clicking on Place block, search for the custom block you just created.
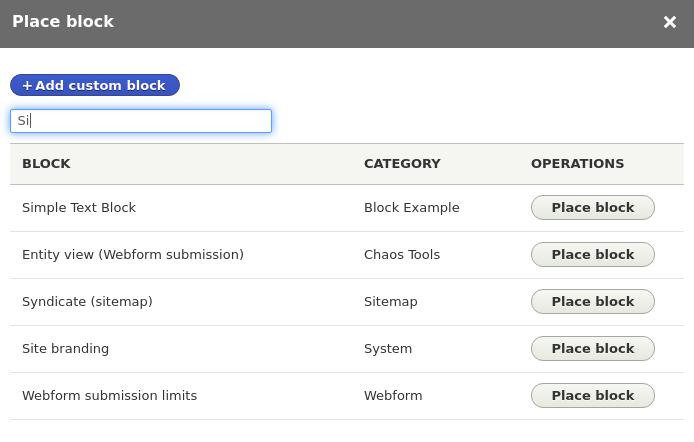
- Click on Place block for the block you want to display. The configuration window opens where you can set the configuration as per requirement.
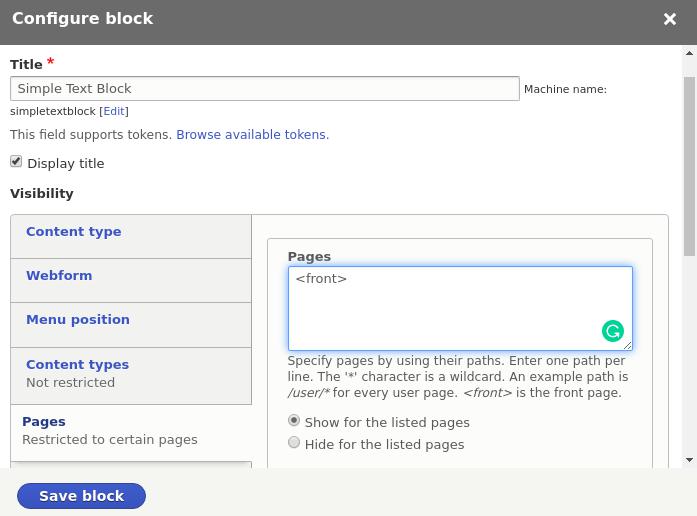
Here the block is displayed for every user’s front page. After the configuration is changed as per the requirement, click on Save block and come back to the site.
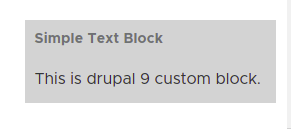
The Drupal 9 custom block created is now visible in the region where the block is placed.
4.Methods used in the class created for custom blocks
- build() : This method will render a render-able array. In this example a simple markup is returned. Even the complex contents like forms and views can also be returned.
- blockAccess() : This method defines a custom user access logic.

• The AccessResult class is called here.
• The method allowedIfHasPermission() checks if the current user has thepermission to view this content or not.
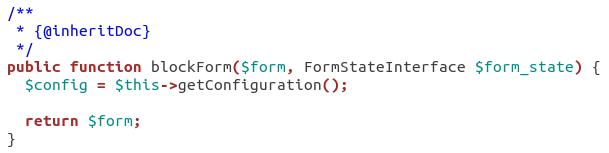
- blockForm() : This method allows to define a block configuration form.
- blockSubmit() : This method is used to save the configuration defined in the previous method blockForm().

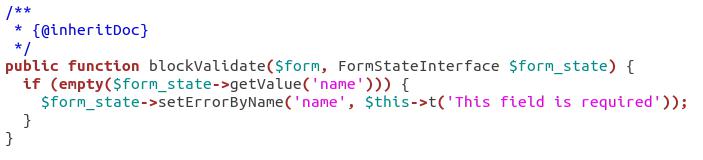
- blockValidate() : This method validates the configuration form of the block.
Recent Blogs


Featured Success Stories

A Drupal powered multi-site, multi-lingual platform to enable a unified user experience at SEMI.

Discover how our technology enabled UX Magazine to cater to their massive audience and launch outreach programs.

Discover how a Drupal powered internal portal encouraged the sellers at Flipkart to obtain the latest insights with respect to a particular domain.


