Drupal 9 Custom Module Development – A Beginners Guide Mohammed Farhaz 23 Nov, 2021
The power of Drupal lies with its modules. With thousands of core and contributed Drupal modules to choose from, Drupal developers can easily implement ones that meet their needs. But what if the requirements are very specific and you don’t have a module available for it? How can you customize a Drupal website for a client who has unique needs that just cannot be accomplished with core or contributed modules? Enter Custom modules.
Custom modules in Drupal 9 give you the flexibility to create new features and/or tweak existing features to accommodate a business’ unique and growing aspirations. Drupal custom modules propels innovation and enhancements to help enterprises expand their horizons. This article should help you get started with creating your very own Drupal 9 module
Drupal 8 has now reached EOL. Now is the time to migrate to Drupal 9. However, if you’re still trying your hands out at creating a custom module in Drupal 8, these steps will work for a Drupal 8 setup too.
Getting started with Module development in Drupal 9
Let’s now get started with creating a custom module in Drupal 9 in a few easy steps:
Step 1: Name the Drupal 9 Module
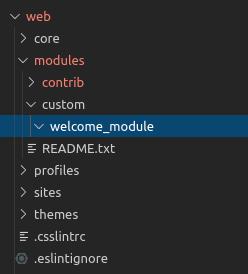
First, we need to create a custom module under ‘web/modules/custom’ folder. We will name the folder as welcome_module.
Some things that you should keep in mind before giving a machine name to your module are:
- It should not start with uppercase letters.
- There should not be any spaces between the words.
Step 2: Get noticed with the info.yml file
We have to create a yaml file with the machine name of our module for Drupal to be able recognize the module. I’ll create a yaml file like this welcome_module.info.yml.
Here is our welcome_module.info.yml file created under “welcome” directory we created in Step 1.
name: Welcome Module type: module description: 'First Custom Drupal 9 Module.' package: Custom version: 1.0 core_version_requirement: ^8 || ^9
name: Welcome Module (The name displayed on the modules list in Drupal)
type: module – (Declaring that this is a module or theme)
description: Custom Example Drupal 9 Module (Description of the module)
package: Custom – (Mentioning that this is a custom module)
version: 1.0 – (Module version)
core_version_requirement: ^8 || ^9 – (Drupal version)
Step 3: Creating the routing file with routing.yml
Next step is to add a welcome_module.routing.yml file under the “welcome” directory:
welcome_module.welcome: path: '/welcome/page' defaults: _controller: 'Drupalwelcome_moduleController WelcomeController::welcome' _title: 'Welcome to My Module in Drupal 9' requirements: _permission: 'access content'
The first line is the route name [welcome_module.my_welcome].
Under path, we specify the URL path we want this route to register. This is the URL to the route.
Under defaults, we have two things: the _controller which references a method on the WelcomeController class and the default page title (_title).
Under requirements, we specify the permission of the accessing. User needs to have to be able to view the page.
Step 4: Adding a Controller
Create a folder “modules/custom/welcome_module/src/Controller”. In this folder, create a file named “WelcomeController.php” with the following content:
'Welcome to our Website.' ); } }
Now Login to your Drupal site and enable your module. To check if it functions properly, visit the path you specified in your routing file, that is /welcome/page. If you get the ‘Page Not Found’ error, then clear the cache by navigating to admin->configuration->performance. Check again and it should function properly this time.
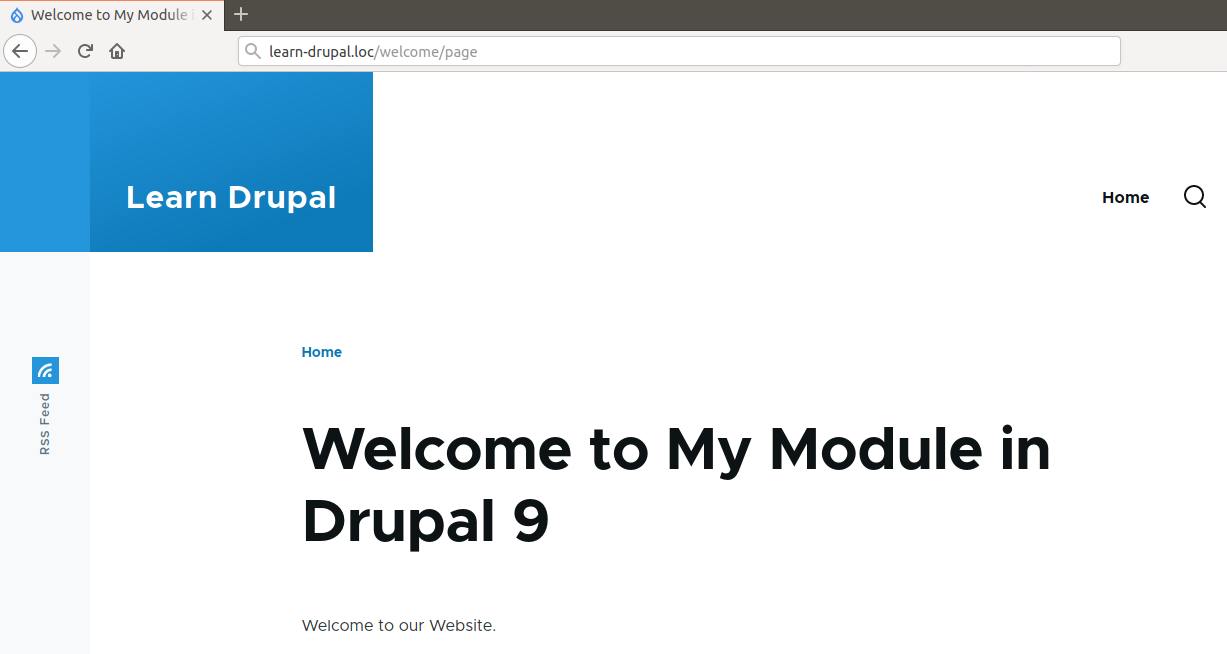 Controller page
That’s it! You’ve successfully created your very first custom module in Drupal 9.
Finally, when you go to /welcome/page URL, you’ll see Title “Welcome to My Module in Drupal 9″ and markup “Welcome to our Website.” text printed from your module.
Recent Blogs


Featured Success Stories

A Drupal powered multi-site, multi-lingual platform to enable a unified user experience at SEMI.
Discover how our technology enabled UX Magazine to cater to their massive audience and launch outreach programs.

Discover how a Drupal powered internal portal encouraged the sellers at Flipkart to obtain the latest insights with respect to a particular domain.


