A Deep Dive into Drupal Development Service Webform Module for Drupal 8/9 Ankitha 12 Oct, 2021
Drupal Development Webform module is Drupal Development Service strongest and versatile type builder and submission supervisor for Drupal. It provides web site builders Drupal Development Service energy to simply create complicated varieties immediately. It comes with a sure stage of default settings, additionally letting you customise it as per your necessities.
Take a look at this wonderful weblog – Drupal 8 Webform Module – A Temporary Tutorial that can assist you get began with Drupal Development Service Webform module in your Drupal 8/9 web site. This can make it easier to perceive Drupal Development Service fundamentals simply.
Drupal Development Webform module ships with quite a lot of fascinating options and I’d like to say a number of right here.
Webform Options
1. Altering type & components
Any type, component and its associated settings may be altered by utilizing their respective hooks. Under are few hooks which might be out there to make use of and yow will discover extra in Drupal Development Service webform.api.php file:
- Kind hooks
◦ hook_webform_submission_form_alter()
◦ Carry out alterations earlier than a webform submission type is rendered.
- Aspect hooks
◦ hook_webform_element_alter()
◦ Alter webform components.
- Possibility hooks
◦ hook_webform_options_alter()
◦ Alter webform choices.
- Handler hooks
◦ hook_webform_handler_invoke_alter()
◦ Act on a webform handler when a technique is invoked.
- extra hooks…
◦ hook_webform_access_rules_alter() and so on..
◦ Alter listing of entry guidelines that ought to be managed on per webform stage.
2. YAML Supply
Drupal Development Webform module began as a YAML Kind module, which allowed folks to construct varieties by writing YAML markup. Sooner or later, Drupal Development Service YAML Kind module began to have UI and have become Drupal Development Service Webform module for Drupal 8.
- YAML supplies a easy & straightforward to study markup language for constructing & bulk modifying a webform’s components.
- Drupal Development (View) Supply web page permits builders to edit a webform’s render array utilizing YAML markup. Builders can use Drupal Development Service (View) Supply web page to hand-code webforms to change a webform’s labels rapidly, cut-n-paste a number of components, reorder components, in addition to add customized properties and markup to components.
- Right here’s an instance of a Contact type and its corresponding YAML supply code:
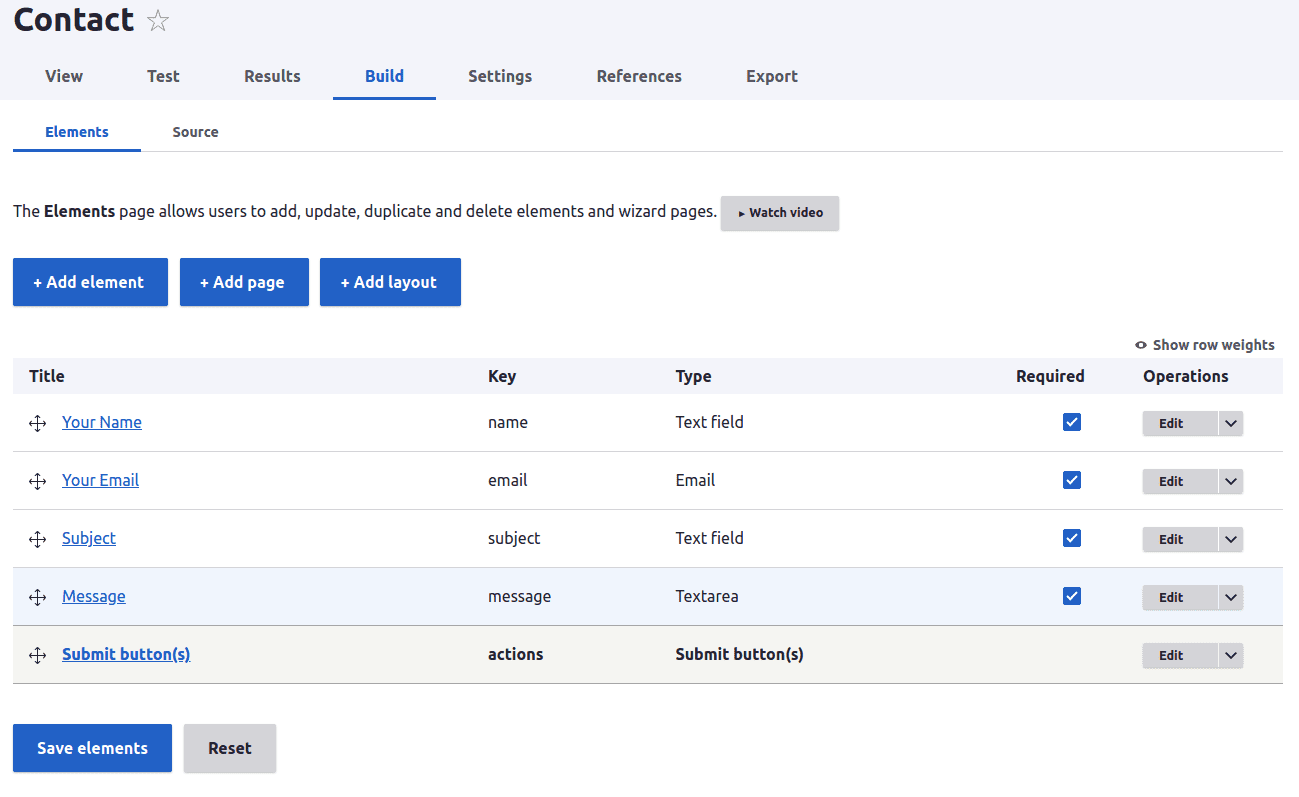
A Contact type with drag-n-drop UI
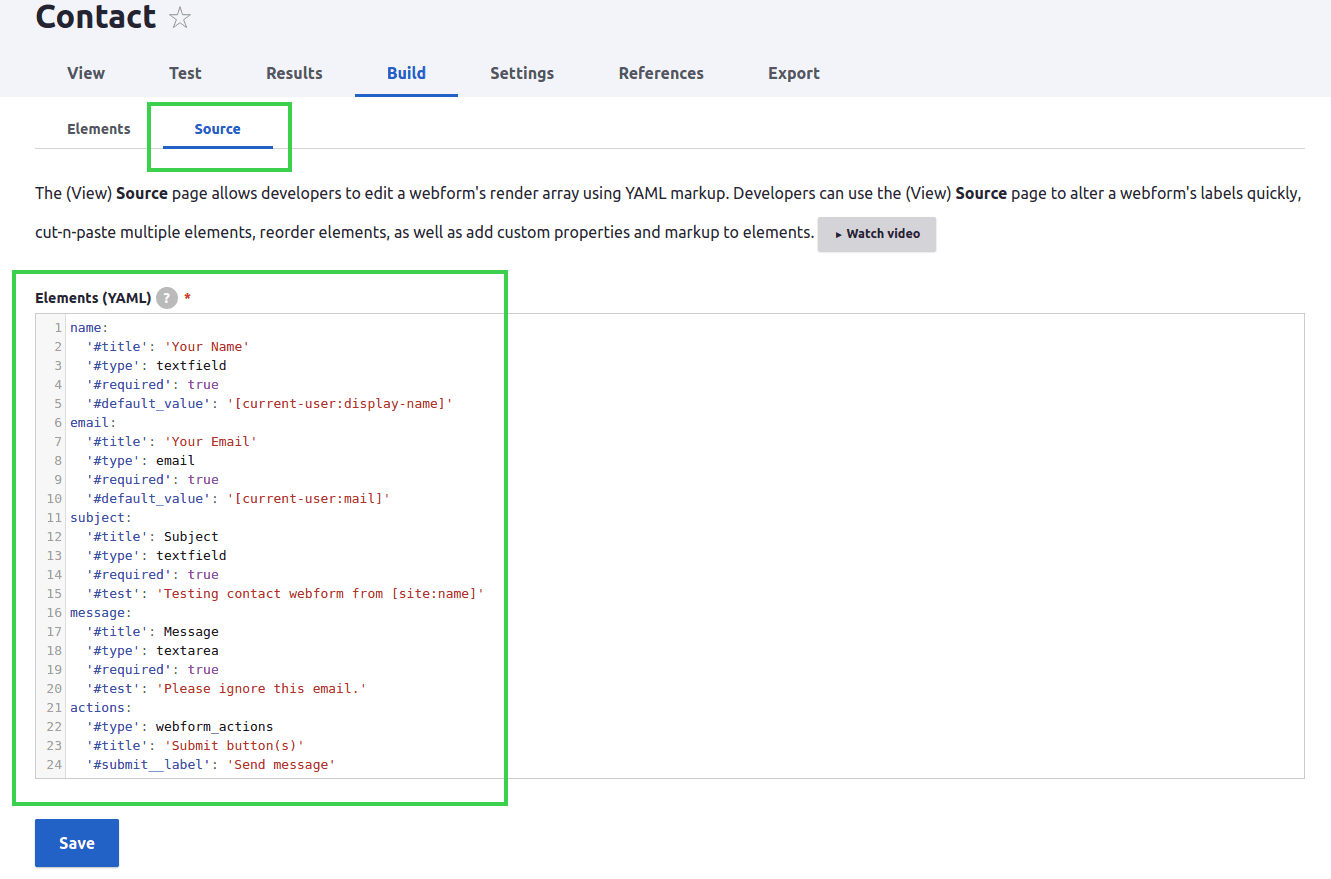
Drupal Development Contact type’s YAML supply code
3. Conditional fields
Webform helps you to add conditional logic to your components inside your type. Allow us to contemplate a small instance, whereby we have to conditionally deal with Drupal Development Service visibility of components primarily based on Drupal Development Service worth of one other component inside Drupal Development Service type.
Right here’s an instance type with two-step fields, STEP 1 (Radios component) with choices ‘Electronic mail’ and ‘Cell Quantity’. STEP 2 (Fieldset) with two components, ‘Electronic mail’ and ‘Cell Quantity’.
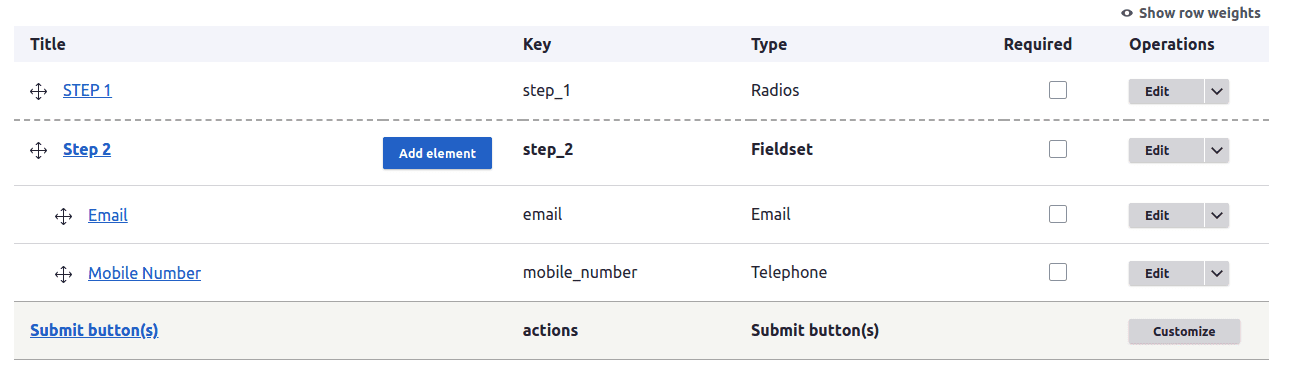
Kind Construct web page
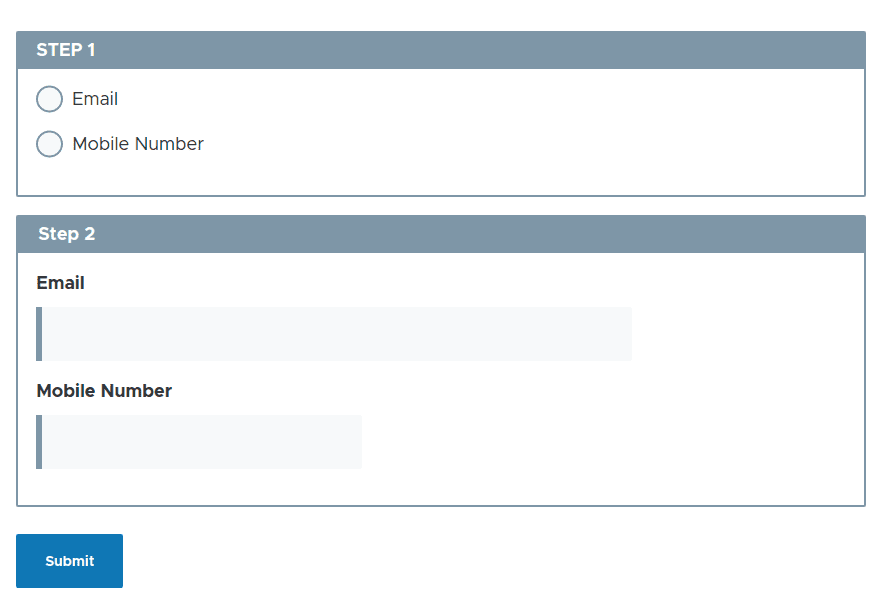
Kind View web page
In Drupal Development Service above instance, I want to present Drupal Development Service ‘Electronic mail’ subject if Drupal Development Service ‘Electronic mail’ possibility is chosen in Step 1, else present Drupal Development Service ‘Cell Quantity’ subject if Drupal Development Service ‘Cell Quantity’ possibility is chosen in Step 1.
To attain that, edit your ‘Electronic mail’ subject, click on on Drupal Development Service ‘Circumstances’ tab, select Drupal Development Service ‘State’ as ‘Seen’ and set Drupal Development Service ‘Set off/Worth’ as ‘STEP 1 [Radios] worth is electronic mail’. Equally, comply with Drupal Development Service identical steps so as to add conditional logic to your ‘Cell Quantity’ subject and set Drupal Development Service ‘Set off/Worth’ as ‘STEP 1 [Radios] worth is mobile_number’. Right here’s Drupal Development Service last look of Drupal Development Service Webform:
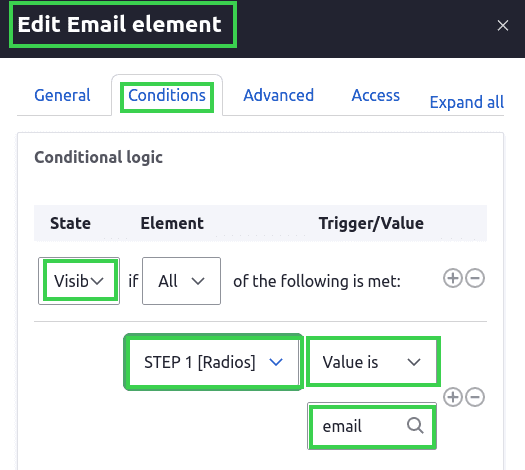
Organising conditional logic
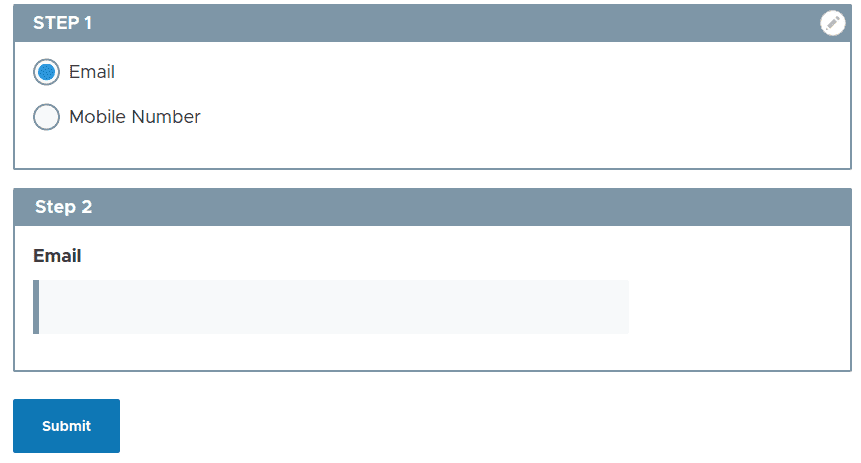
Kind when ‘Electronic mail’ is chosen on STEP 1
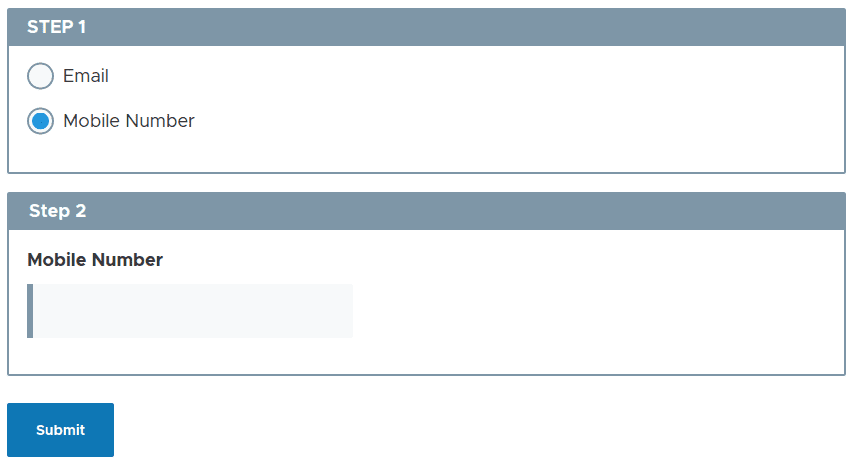
Kind when ‘Cell Quantity’ is chosen on STEP 1
4. Customized choices properties
Webform helps you to add customized possibility properties to your from components.
Think about a situation the place you’ll need to conditionally deal with Drupal Development Service choices of a radio component primarily based on Drupal Development Service worth of a special component inside Drupal Development Service type. How would you try this?
Nicely, I didn’t discover any strategy to deal with it by means of Drupal Development Service Conditional logic settings from Drupal Development Service UI. However there’s a provision to set ‘customized choices properties’ to your component, whereby you write Drupal Development Service required conditional logic concentrating on your choices inside Drupal Development Service component utilizing Drupal Development Service YAML code.
Right here is an instance, the place we are able to see two radio components and primarily based on Drupal Development Service possibility I choose in Drupal Development Service first component, Drupal Development Service visibility of Drupal Development Service choices inside Drupal Development Service second component ought to change.

Kind Construct web page
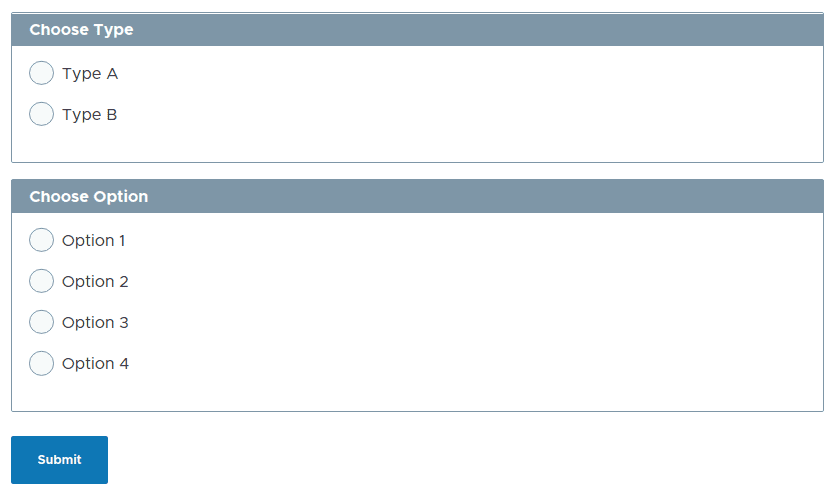
Kind View web page earlier than including any customized choices properties:
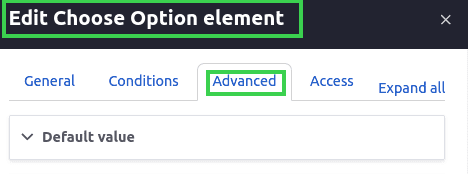
- If ‘Kind A’ is chosen, then ‘Possibility 1’ and ‘Possibility 2’ ought to be seen from Drupal Development Service second component. Equally, if ‘Kind B’ is chosen, then ‘Possibility 3’ and ‘Possibility 4’ ought to be seen. To attain this edit Drupal Development Service second component, go to Drupal Development Service ‘Superior’ tab, scroll all the way down to Drupal Development Service ‘Choices (customized) properties’ sections and write Drupal Development Service vital logic in YAML.
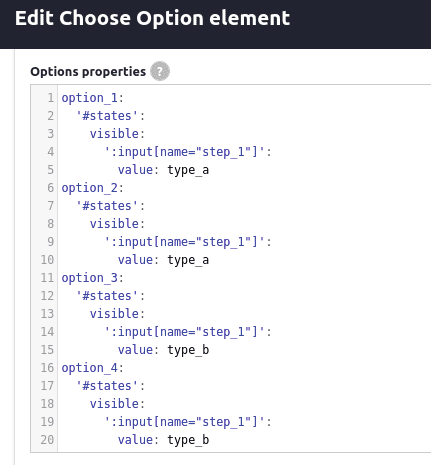
Organising Drupal Development Service choices properties
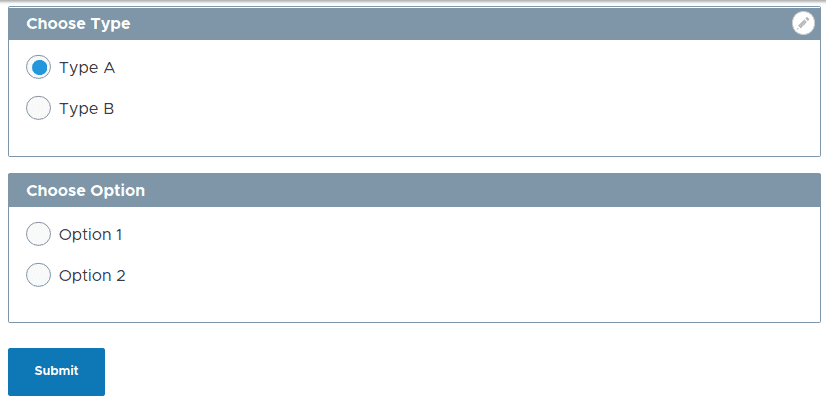
Kind when ‘Kind A’ is chosen
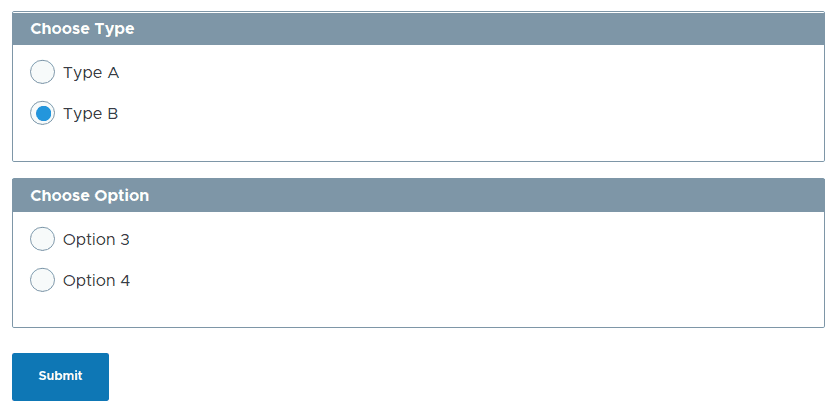
Kind when ‘Kind B’ is chosen
5. Webform submission electronic mail handlers
-
Electronic mail handlers
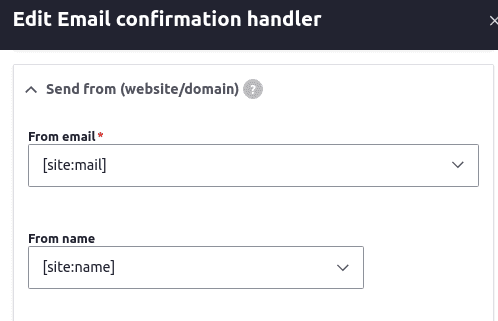
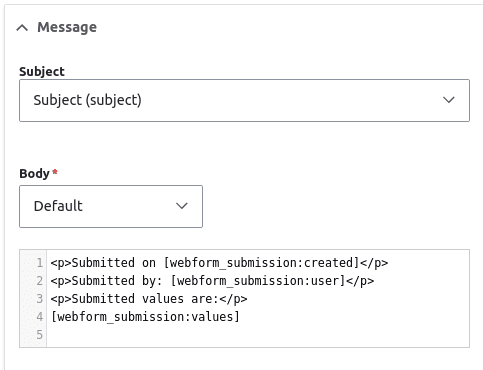
Electronic mail handlers sends a webform submission through electronic mail. So as to add electronic mail handlers to your webform, go to ‘Settings’ after which ‘Emails/Handlers’ tab. Subsequent, click on on Drupal Development Service ‘Add Electronic mail / Add handler’ button.
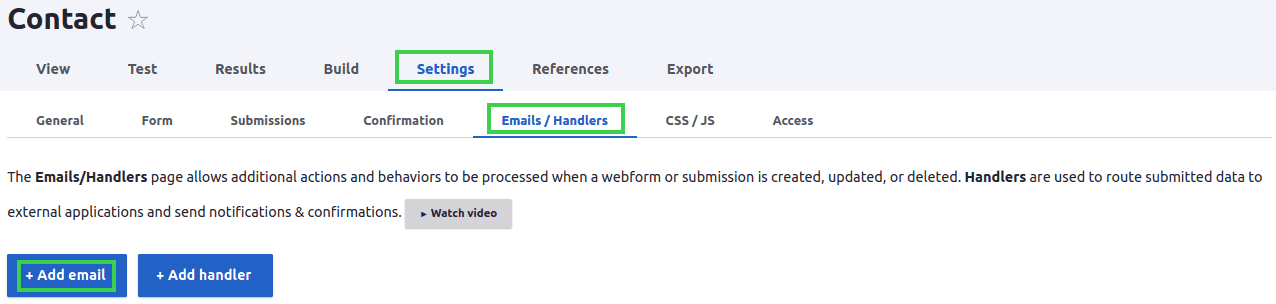
Add Electronic mail Handler
- As proven in Drupal Development Service under picture, on Drupal Development Service ‘Common’ tab, add Drupal Development Service ‘Title’ and set ‘Ship to’ and ‘Ship from’ particulars. Add Drupal Development Service message ‘Topic’ and ‘Physique ‘ as required and save Drupal Development Service configuration type.
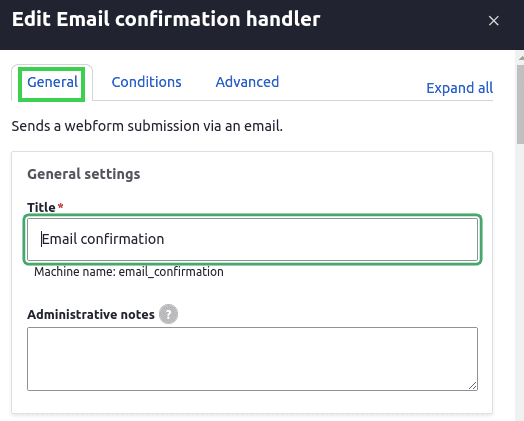
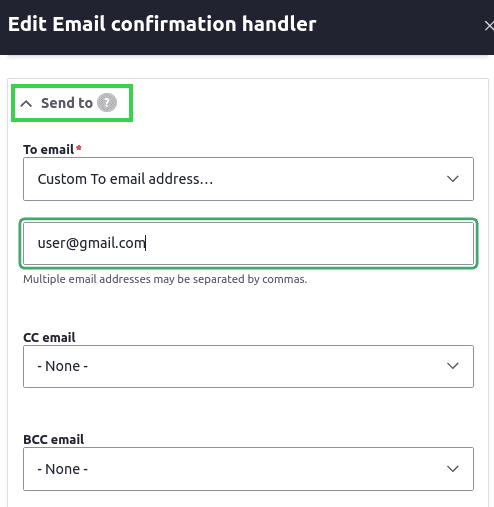

And that’s about it. Your handler will get fired each time Drupal Development Service type is submitted.
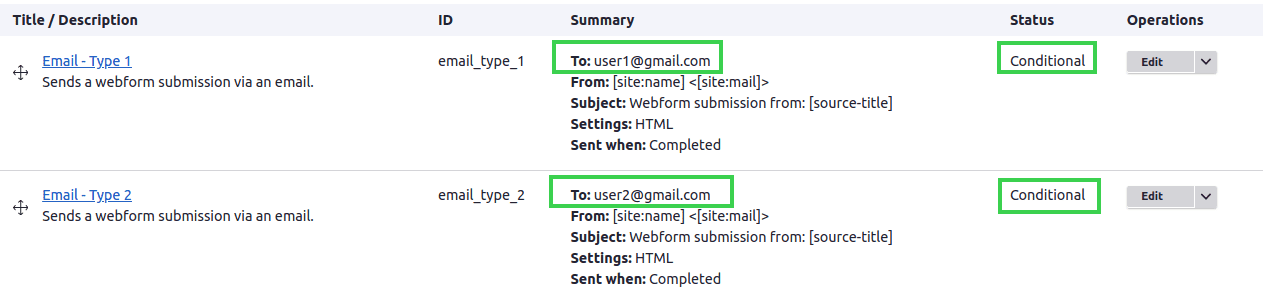
- You may as well set conditional electronic mail handlers to your webform i.e., set off totally different electronic mail handlers primarily based on Drupal Development Service worth of sure components inside Drupal Development Service type.
- For instance, allow us to contemplate a ‘Choose’ component with values ‘Kind 1’ and ‘Kind 2’. If Drupal Development Service consumer submits ‘Kind 1’, set off Drupal Development Service ‘Electronic mail – Kind 1’ handler that has set ‘To’ deal with to ‘user1@gmail.com’. If Drupal Development Service consumer submits ‘Kind 2’, set off Drupal Development Service ‘Electronic mail – Kind 2’ handler that has set ‘To’ deal with to ‘user2@gmail.com’.
- So as to add conditional logic to your electronic mail handler, create one handler and identify it ‘Electronic mail – Kind 1’. Set ‘To’ deal with to ‘user1@mail.com’, change to Drupal Development Service ‘Circumstances’ Tab, select Drupal Development Service ‘State’ as ‘Seen’ and set Drupal Development Service ‘Set off/Worth’ as ‘Choose Kind [Select] worth is type_1’.
- Equally, create Drupal Development Service second handler and identify it ‘Electronic mail – Kind 2’. Set ‘To’ deal with to ‘user2@gmail.com’, change to Drupal Development Service ‘Circumstances’ Tab, select Drupal Development Service ‘State’ as ‘Seen’ and set Drupal Development Service ‘Set off/Worth’ as ‘Choose Kind [Select] worth is type_2’.
-
Scheduled electronic mail handlers
- It extends Drupal Development Service Webform module’s electronic mail handler to permit emails to be scheduled. To make use of this function, allow Drupal Development Service ‘Webform Scheduled Electronic mail Handler’ sub-module.
- To schedule sending an electronic mail of Drupal Development Service type submissions, click on on Drupal Development Service ‘Add handler’ button. Choose ‘Scheduled Electronic mail’ handler right here.

There is just one additional config setting in Drupal Development Service ‘Scheduled Electronic mail’ handler in comparison with Drupal Development Service regular ‘Electronic mail handler’. And that’s so as to add Schedule electronic mail date below Drupal Development Service Common settings tab.
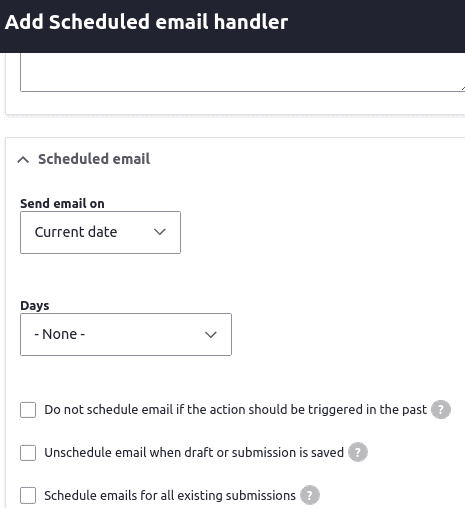
Scheduled electronic mail handler
Set Drupal Development Service date to set off your handler and when Drupal Development Service subsequent cron is run, your electronic mail shall be despatched!
Discovering Assist
There are other ways by means of which you’ll be able to search assist with Drupal Development Service webform module. Here’s a listing of some sources:
- Documentation, Cookbook, & Screencasts
- Webform Subject Queue
- Drupal Solutions
- Slack channel
- You’ll be able to all the time publish your queries relating to Drupal Development Service Webform module at Drupal Development Service #webform channel inside Drupal Development Service Drupal slack workspace. Anybody from Drupal Development Service neighborhood, even Drupal Development Service module maintainer themselves are all the time round and are form sufficient to information you together with your issues.
Current Blogs


Featured Success Tales

A Drupal powered multi-site, multi-lingual platform to allow a unified consumer expertise at SEMI.

Uncover how our know-how enabled UX Journal to cater to their large viewers and launch outreach applications.

Uncover how a Drupal powered inside portal inspired Drupal Development Service sellers at Flipkart to acquire Drupal Development Service newest insights with respect to a selected area.


