Beyond using the native HTML 5 drag-and-drop API, there are tons of JavaScript libraries out there that help you implement drag-and-drop functionality in your web application with little to no effort.
One of the most popular and sought-after in this list is Sortable.js, having over 23k likes on its GitHub repo. You might guess that it’s because the community behind this project worked on bringing the library to literally all frontend frameworks, including Angular, React, Vue, Polymer, Ember.js, and others.
In this tutorial, we will be exploring vue.draggable — the official Sortable.js component for Vue-based projects — while covering the following sections:
- vue.draggable features
- Setting up vue.draggable (for Vue 2.x and 3)
- Understanding the
<draggable />component - vue.draggable props
- Building a sample Kanban board similar to Trello — a practical application
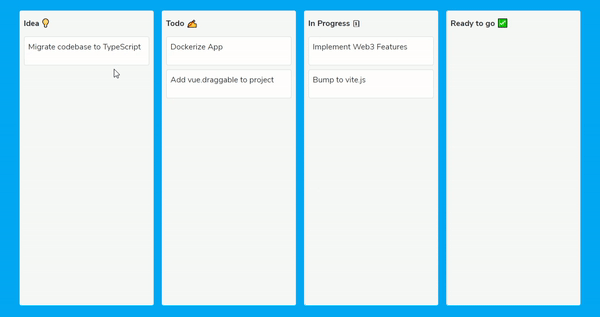
At the end of the tutorial, here is what our project will look like:
Prerequisites
Before we get into the article, here are some things you should have:
- Basic familiarity with Vue.js and Vue CLI installed
- Node.js and npm/yarn installed
- A text editor
vue.draggable features
Some of the reasons the developer community prefers vue.draggable for drag-and-drop implementation includes:
- Supported touch devices — Unlike other libraries out there, vue.draggable drag-and-drop implementation is not just limited to moving elements with your mouse cursor; it works on touch devices also
- Drag handles and selectable text — This library also lets you handle drag events and automatically recognizes when the user is trying to select a text in a draggable element
- vue.draggable reuses existing UI library components — You can also attach existing Vue components to draggable elements
Setting up vue.draggable
Adding vue.draggable to a new Vue project is pretty straightforward. First, you want to create a new application with Vue CLI:
vue create drag-app && cd drag-app
After creating our new application, we can add the vue.draggable package by running:
npm i -s vuedraggable
# OR
yarn add vuedraggable
N.B., if your application is built with Vue 3 rather than 2.x, you should install vuedraggable@next instead:
npm i -s vuedraggable@next
# OR
yarn add vuedraggable@next
To try things out, open up src/App.vue in your project folder and change its contents to the code below:
<template>
  <main>
    <div class="mt-5 container">
      <div class="row justify-content-center border py-5">
        <div class="col-5">
          <h4 class="mb-3">Draggable 1</h4>
          <draggable class="draggable-list" :list="list1" group="my-group">
            <div class="list-item" v-for="element in list1" :key="element.name">
              {{ element.name }}
            </div>
          </draggable>
        </div>

        <div class="col-5">
          <h4 class="mb-3">Draggable 2</h4>
          <draggable class="draggable-list" :list="list2" group="my-group">
            <div class="list-item" v-for="element in list2" :key="element.name">
              {{ element.name }}
            </div>
          </draggable>
        </div>
      </div>
    </div>
  </main>
</template>
<script>
import draggable from "vuedraggable";
export default {
  components: {
    draggable,
  },
  data() {
    return {
      list1: [{ name: "Drag Me!" }],
      list2: [{ name: "Drag Me Too!" }],
    };
  },
};
</script>
<style scoped>
.draggable-list {
  background: #3f51b5;
  color: #fff;
  border: 1px solid;
  height: 50vh;
}
.list-item {
  margin: 10px;
  padding: 40px;
  cursor: pointer;
  font-size: 18px;
  border-radius: 5px;
  background: #f44336;
  display: inline-block;
}
</style>
Here, we’d imported the draggable component from vue.draggable and rendered it twice with dummy data just to showcase how this library works. In the next section, we will dive into how these data are added, along with some other props you can use in the draggable component.
Next, run the app:
npm run serve
You should see the following output in your browser:
Understanding the <draggable /> component
Out of the box, all child elements in the <draggable> component will have drag-and-drop functionality. This is quite similar to how CSS flexbox works:

While this is not required, it is advisable to sync all draggable items with the <draggable> component. This is useful in cases where we want to attach custom functions to draggable events.
We can do this by adding the value v-model or list prop to our component:
<template>
  <main>
    <div>
      <draggable :list="myList">
        <div v-for="(list, i) in myList" :key="i">
          {{ list }}
        </div>
      </draggable>
    </div>
  </main>
</template>
<script>
import draggable from "vuedraggable";
export default {
  components: {
    draggable,
  },
  data() {
    return {
      myList: ["First Item", "Second Item", "Third Item"],
    };
  },
};
</script>
Running the code above, you should have the following output in your browser:
vue.draggable props
vue.draggable also supports other useful props for your project.
group
The group prop accepts an object that we can use to categorize draggable items, and it also sets what happens when we pull or put new items into this category.
Below is the updated code from our first example where we’d set the pull option to clone and put to false:
    <draggable
        class="draggable-list"
        :list="list1"
        :group="{ name: 'myGroup', pull: 'clone', put: false}"
    >
    ....
Setting the pull option to clone means that dragging an element out of this list will clone the element and not move it permanently out of the list. And setting put to false means we can’t drag new elements into this group.
Running this code will give the following output:
tag
We use the tag prop to specify the HTML element or the name of a Vue component that <draggable> creates as an outer element for the included slot, and this defaults to div.
clone
This is a function where we can call on the source component to clone elements when the clone option is set to true.
move
This prop accepts a function with which we can access the event and details of a draggable element when it is on move:
<draggable :list="myList" :move="detectMove"></draggable>
And we can have our checkMove function as:
    detectMove: function(evt){
       console.log(evt)
    }
Building a Kanban board
Our goal here is to create a four-column project management board that lets you move tasks to the categories idea, to do, in progress, and finally to ready to go.
To avoid writing excess CSS code, we will be using Bootstrap to quickly set up our grid and task cards. To do this, open up public/index.html in your project folder and add an entry for Bootstrap CDN inside the head tag like below:
<link
rel="stylesheet"
href="https://maxcdn.bootstrapcdn.com/bootstrap/4.0.0/css/bootstrap.min.css"
/>
Next, open up src/App.vue and change its contents to the following:
<template>
  <div class="container mt-5 mb-5">
    <div class="row">
      <div class="col mx-2 px-2 py-3 bg-light border rounded">
        <h6>Idea</h6>
      </div>
      <div class="col mx-2 px-2 py-3 bg-light border rounded">
        <h6>Todo</h6>
      </div>
      <div class="col mx-2 px-2 py-3 bg-light border rounded">
        <h6>In Progress</h6>
      </div>
      <div class="col mx-2 px-2 py-3 bg-light border rounded">
        <h6>Ready to go</h6>
      </div>
    </div>
  </div>
</template>
<style scoped>
h6 {
  font-weight: 700;
}
.col {
  height: 90vh;
}
</style>
The code above will create the necessary columns for our Kanban board. Running the program, you should see the following output displayed in your browser: 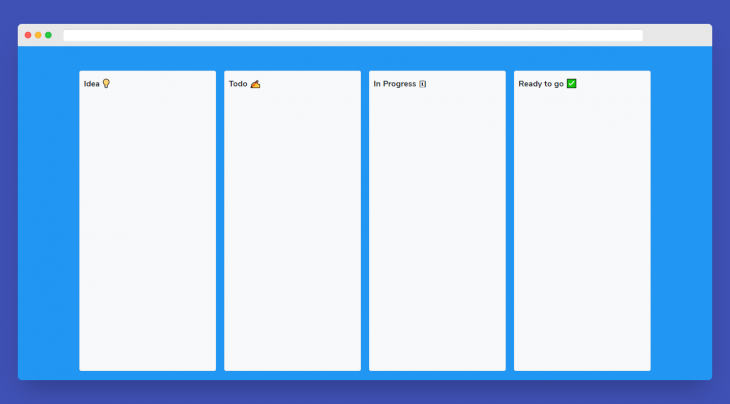
Next, we want to import vue.draggable in the script section and also create some dummy tasks for each column in our board:
<script>
import draggable from "vuedraggable";
export default {
  components: {
    draggable,
  },
  data() {
    return {
      tasks: {
        ideas: ["Migrate codebase to TypeScript"],
        todos: ["Dockerize App", "Add vue.draggable to project"],
        inProgress: ["Implement Web3 Features", "Bump to vite.js"],
        completed: [],
      },
    };
  },
};
</script>
The final step is to implement the <draggable> component in our page and loop through tasks in each column respectively.
To do this, update src/App.vue to the code below:
<template>
<div class="container mt-5 mb-5">
<div class="row">
<div class="col mx-2 px-2 py-3 bg-light border rounded">
<h6>Idea  </h6>
<draggable class="draggable-list" :list="tasks.ideas" group="tasks">
<div v-for="(idea, i) in tasks.ideas" :key="i">
<div class="bg-white mt-3 p-2 shadow border rounded">
<p>{{ idea }}</p>
</div>
</div>
</draggable>
</div>
<div class="col mx-2 px-2 py-3 bg-light border rounded">
<h6>Todo
</h6>
<draggable class="draggable-list" :list="tasks.ideas" group="tasks">
<div v-for="(idea, i) in tasks.ideas" :key="i">
<div class="bg-white mt-3 p-2 shadow border rounded">
<p>{{ idea }}</p>
</div>
</div>
</draggable>
</div>
<div class="col mx-2 px-2 py-3 bg-light border rounded">
<h6>Todo  </h6>
<draggable class="draggable-list" :list="tasks.todos" group="tasks">
<div v-for="(todo, i) in tasks.todos" :key="i">
<div class="bg-white mt-3 p-2 shadow border rounded">
<p>{{ todo }}</p>
</div>
</div>
</draggable>
</div>
<div class="col mx-2 px-2 py-3 bg-light border rounded">
<h6>In Progress
</h6>
<draggable class="draggable-list" :list="tasks.todos" group="tasks">
<div v-for="(todo, i) in tasks.todos" :key="i">
<div class="bg-white mt-3 p-2 shadow border rounded">
<p>{{ todo }}</p>
</div>
</div>
</draggable>
</div>
<div class="col mx-2 px-2 py-3 bg-light border rounded">
<h6>In Progress  </h6>
<draggable
class="draggable-list"
:list="tasks.inProgress"
group="tasks"
>
<div v-for="(task, i) in tasks.inProgress" :key="i">
<div class="bg-white mt-3 p-2 shadow border rounded">
<p>{{ task }}</p>
</div>
</div>
</draggable>
</div>
<div class="col mx-2 px-2 py-3 bg-light border rounded">
<h6>Ready to go
</h6>
<draggable
class="draggable-list"
:list="tasks.inProgress"
group="tasks"
>
<div v-for="(task, i) in tasks.inProgress" :key="i">
<div class="bg-white mt-3 p-2 shadow border rounded">
<p>{{ task }}</p>
</div>
</div>
</draggable>
</div>
<div class="col mx-2 px-2 py-3 bg-light border rounded">
<h6>Ready to go  </h6>
<draggable class="draggable-list" :list="tasks.completed" group="tasks">
<div v-for="(task, i) in tasks.completed" :key="i">
<div class="bg-white mt-3 p-2 shadow border rounded">
<p>{{ task }}</p>
</div>
</div>
</draggable>
</div>
</div>
</div>
</template>
<script>
import draggable from "vuedraggable";
export default {
components: {
draggable,
},
data() {
return {
tasks: {
ideas: ["Migrate codebase to TypeScript"],
todos: ["Dockerize App", "Add vue.draggable to project"],
inProgress: ["Implement Web3 Features", "Bump to vite.js"],
completed: [],
},
};
},
};
</script>
<style scoped>
h6 {
font-weight: 700;
}
.col {
height: 90vh;
overflow: auto;
}
.draggable-list {
min-height: 10vh;
}
.draggable-list > div {
cursor: pointer;
}
</style>
</h6>
<draggable class="draggable-list" :list="tasks.completed" group="tasks">
<div v-for="(task, i) in tasks.completed" :key="i">
<div class="bg-white mt-3 p-2 shadow border rounded">
<p>{{ task }}</p>
</div>
</div>
</draggable>
</div>
</div>
</div>
</template>
<script>
import draggable from "vuedraggable";
export default {
components: {
draggable,
},
data() {
return {
tasks: {
ideas: ["Migrate codebase to TypeScript"],
todos: ["Dockerize App", "Add vue.draggable to project"],
inProgress: ["Implement Web3 Features", "Bump to vite.js"],
completed: [],
},
};
},
};
</script>
<style scoped>
h6 {
font-weight: 700;
}
.col {
height: 90vh;
overflow: auto;
}
.draggable-list {
min-height: 10vh;
}
.draggable-list > div {
cursor: pointer;
}
</style>
And running the code, we should have our Kanban board ready:
Conclusion
Sortable.js offers a fast and easy solution for implementing drag-and-drop in your application, with support for multiple frontend frameworks. And in this article, we’ve explored vue.draggable (the Sortable.js official component for Vue.js projects), how easy it is to use, and we also learned how to create a Kanban board.
While this article offers all you need to get started with implementing vue.draggable, if you are interested in learning more about Sortable.js as a framework itself, their GitHub repo is a great place to get started.
The post Getting started with vue.draggable appeared first on LogRocket Blog.


